What Did You Do? Wednesdays

Calling all fall fanatics, adventurous organizers, exercise procrastinators, perfectionists unable to make a move unless they're certain it will turn out with ultimate precision, messy Marvins, and any other category you put yourself in ~ stop by each Wednesday and share what you did that week. Big things, little things, adventurous things, nothin' much things, somethin' special things....doesn't matter.

Share your just one thing on What Did You Do? Wednesdays!


Showing posts with label Creative Stuff. Show all posts

Friday, October 22, 2010

Garbage Bag Witch

Yesterday I had Lasik surgery, so I am laying low yet today.  Meanwhile, here's a re-post from last year.  I had fun making this smart gal.  Maybe you'll be tempted after your own leaf-raking this weekend......


Last week my husband raked leaves and mowed the lawn for the final time this year. He bagged the clippings and prepared them for the next garbage pick-up. I walked by the bags as I took my daughter to the bus stop, and when I met her upon arrival home from school. I walked by the bags on my way to and from the mailbox. Something tugged at me each time. As if a spell had come over me, I felt compelled to create! I'm sure the possibilities are endless, but here's what transpired.


Boring bag of clippings/leaves


Roll of white paper and double-wide construction paper


Introducing Ms. Witch!


I didn't use any patterns...just drew on the construction paper freehand. And everything you see is from construction paper except the witch's hat that I got on clearance two years ago for $.19.


Making

The Girl Creative


Texas Monkey

IhookedupwithHoHlamespice


504 Main

Tuesday, May 11, 2010

Elizabethan Collar Scarf - Tutorial

Old things freak me out.  Honestly, it's a true phobia of mine.  The smell of antiques just about puts me over the edge.  The creepiness of vintage clothes and shoes makes me shiver.  Freaky, old furniture sends me running in the opposite direction.  Show me a porcelain-headed doll with teeth and I'm done.  There is nothing in my present life that would make this phobia seem logical, so maybe in a past life I was tormented in some manner.  Who knows.  But as for my future lives, I'm hopeful to become a variety of things, but that's for another post.  One day when it's slow on the blog-o-sphere, I'll hit you with my dreams of things in the afterlife.  (I'm kidding here, folks....but it's a fun thought nonetheless.)

Anyway, I wanted to make my mom a scarf and it surprised me to see the Elizabethan nature of it when I finished.  But I thought it was cool anyway.


It won't even need much explanation, you can whip one up in no time.

I used gauze fabric and didn't even hem the edges. I simply cut them with a pinking shears.

I doubled the fabric so that there 2 layers. My width was about 7" and my final length was about 50". Since you'll be making gathers, remember to double whatever you want your final length to be. In my case, about 3 yards.

Here are the actual directions:

1)  Wash and dry fabric.

2)  To keep my lines straight, first I cut the fabric on my cutting board with a rotary ruler and then just trimmed the edges with a pinking shears.

3)  Pin your 2 layers of fabric wrong-sides together so they don't slip while you're running the long stitches down the middle.  (Honestly, I didn't use one long strip.  I cut 4 strips, sewing 2 together, and then 2 more together and used these for my 2 layers of fabric.  That way you don't have to buy as much.  Just make sure your right sides and wrong sides match up correctly.)

4)  Hand-wind elastic thread in your bobbin.

5)  Decide where you want your gathering to be.  From my 7" width, I chose to gather in three places.  One in the middle at 3.5", the others 1.25" on either side of that point (therefore, 2.25" and 4.75").

6)  Sew straight lines ALL THE WAY down the strip of fabric.  Using elastic thread in your bobbin, allows it gather on its own.  Remember to back stitch.

Up close and personal.  Can you see the 3 places where I stitched?


See? Not even creepy.
_____________________________________________________________

Linked up to these rockin' parties:

Show and Tell @ Blue Cricket Designs
Whatever Goes Wednesday @
Someday Crafts
Get Your Craft On @ Life As Lori
Strut Your Stuff Thursday @ Somewhat Simple
Wednesday Link Party @ Tea Rose Home

Thursday, April 29, 2010

Diapers to Pull-Up Undies Tutorial

A couple of months ago when my daughter was still potty training, we had a whole stack of diapers which were fine for the nighttime, but during the day they just weren't convenient. Our supply of the pull-up variety was coming to an end, yet I couldn't see buying more when we had so many regular diapers left. Enter my diaper to pull-ups conversion. It goes something like this:

All you'll need is a pair of diapers, a sewing machine, regular thread and elastic thread.

First, put the diaper on your child and mark where the tabs come together so that when you take them off and sew them, you'll know the proper size of the undies-to-be.

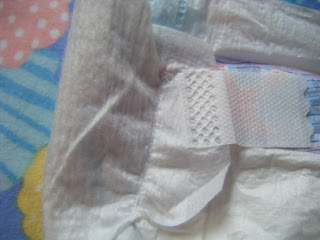
See this white tab right here?


This is the one with the stretch to it. We want to keep this and we'll sew along the side of it.  (I've showed you the right tab here, but in the next picture I'm actually sewing the left first...sorry about that.)


Leave your tab attached in the spot that you fastened it when you fit your child in the diaper.  All you're going to do is sew the actual tab section to the diaper.

When you sew it, you will want to use elastic thread in the bobbin.  Hand-wind your bobbin with elastic thread, place it in the machine like normal, and you're set to make a pair of training underwear.  Make sure to back stitch as well.


Jumping ahead just a bit, I want you to see how it will look on the outside when you have it sewn up.


Now let's go back.  When you flip it to the inside, sew along this portion of the diaper.  If it starts to get confusing over what part goes where, just look at the front again and remember all you really need to do is sew the tab down and allow the stretchy tab to do its job.


Here are the inside tabs that you won't need anymore. Actually, they'll just kind of get in the way, so you can snip them off.


The final product is here. You can see that they don't have to be perfect. Again, the main point is that you stitch that outside tab down and allow the stretchy flap to stretch as much as it can. By using the elastic bobbin thread, you've also established a little more "give".

Now your big boy or big girl is all ready for potty training and you just saved some money.

If, by chance, you STILL have diapers left over (various sizes are kind of good), they make wonderful hot and cold packs. Run HOT (but don't burn yourself!) or COLD water into the diaper just until they're saturated, but not too filled up. They're awesome because they hold the temperature quite a long while, don't leak, and don't cause your clothes to get wet. FYI: Nursing Moms, they are so great for blocked milk ducts!

__________________________________________________________________
Linked to:
It's a Hodgepodge Friday @ It's a Hodgepodge Life
Frugal Fridays @ lifeasmom.com
Check Me Out Saturdays @ A Vision To Remember
Saturday is Crafty Day @ Along For The Ride
Weekend Wrap-Up Party @ Tatertots and Jello
Sunday Showcase Party @ Under The Table And Dreaming
Making The World Cuter Monday @ Making The World Cuter
Made By You Mondays @ Skip To My Lou
Motivate Me Monday @ Keeping It Simple
Just Something I Whipped Up Monday @ The Girl Creative
Market Yourself Monday @ Sumo's Sweet Stuff

Friday, April 23, 2010

Puffy Flowers On-A-Stick Tutorial

So you've got your trusty "on-a-stick" standbys, right?  You've got your various meats on-a-stick like corn dogs and kabobs complete with veggies and fruit.  There's spun sugar on-a-stick (come on, let's give it up for my beloved Cotton Candy).  Surely any county fair across the good ol' USofA is bound to offer a whole host of disgusting, heart clogging "on-a-stick" varieties, but enter the Puffy Flowers on-a-Stick.  Fat free, calorie free, cholesterol free.  And considering the supplies, almost cost free.

It's a "WYSWYG" tutorial. You know, "what you see is what you get." Here we go!


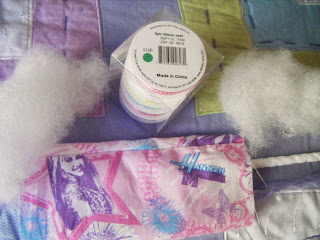
Supplies: fabric, template/shape to trace around (or freehand cuts the mustard too), pen, 3/16 dowel, fiberfill, scissors/pinking shears


Jo-Ann's has a large selection of dowels, but any hardware store should as well. You can see the diameter and length of the ones I bought. For the vases I had, it worked perfectly to just saw them in half, but you'll be able to gauge what height will look best in your creation.


Trace around your template/shape. I added an extra inch all the way around just by eyeballing it.

Cut out 2 shapes for each flower (front and back).  I used a pinking shears to give it a little more character.

Place 2 pieces, wrong sides together and simply sew around the petals leaving about a 1/4" seam.  I used a sewing machine, but you could certainly do a running stitch by hand.  Leave a 1" hole in between 2 petals for stuffing.

Push fiberfill into each formed flower, using the dowel to distribute it into each petal.

Saw dowel to desired length and place it far enough in to establish stability.


You can hand sew this open part closed, but I actually didn't. The type and print of fabric I used was very forgiving.

You're done!

These are so fast and simple that I whipped them up Easter a.m. before company came. Thus, the Mod Podged (with pages from a book) eggs in the vases.

I got the set of vases for $8 at our Hospice Thrift Store, and the filler is a brown paper bag I ran through the shredder.

It would also look cute with double-sided scrapbook paper shredded in the vases, painted ping pong balls on top and colorful spring fabric flowers, don't you think?

___________________________________________________________
Party on!!


UndertheTableandDreaming
Funky Junk's Saturday Nite Special


Thursday, March 25, 2010

Stuffed Garland

Last night I got wind of this challenge.  It really was late, and I was Practically Spent, so I put it out of my mind.  But my subconscious sometimes knows me better than I do, and at 4pm today, an idea popped into my head.  Before I knew what hit me, I was in action.  I guess I just can't turn down a good challenge, especially where prizes are involved.  Here, then, is my Living With Lindsay $5 Challenge entry.

I made this garland for my daughter's bedroom window, but I have so many ideas about the fabric that could be used and where it could be hung, that it's an endless world of garland wonder.

It's a nice, little spring pick me up, and it cost me under $5, no problem.  Here are the supplies I used:

I had gotten the fabric as a remnant at Jo-Ann's a while back.  It was just a little strip, costing $.87.  I had the pins and scissors.  Although I used a rotary cutter to cut the strips, surely a scissors would have been just fine since it's not a super exact project.


I also used a pack of ribbon from Target's dollar spot, but I had gotten it at 50% off.....probably after last Easter.  You can use any type of yarn, twine, string, ribbon to tie the garland balls to.  I used two colors of yarn.  The white I got from the Hospice Thrift Store for $.99, and the lavender was given to me in a bag full of unwanted craft leftovers from a friend.  You will also need some stuffing.  I had a bag of opened but barely used batting that I had gotten at a massive annual garage sale in my community last June ($.25).  But anything from tissue paper to cotton balls to Sunday newspaper ads will work.


You will be making fabric tubes, and you can choose any size you like, but I cut mine 4"x7".  I cut 6 of these 4"x7" strips in order to make a total of 12 tubes.


Next, put the right sides together.  Pin the long 7" sides, and sew these 7" sides only using a few back stitches at each end.


Trim the extra thread.  Now you have a tube that you will turn inside out so the right side is back on the outside where you can see it.


Lay your yarn out on a flat surface and pull your sewn tube at desired intervals of where you'd like them to hang, making sure to keep enough yarn at the ends for hanging.

In this picture you can see how one has already been fed on the yarn and stuffed, and the other is still just the tube of fabric.


Position your tube with the yarn now running through it with the seams on the top and bottom.

Next it's time to fill the tube.  What I did was put a bunch both above and below the yarn to help balance how it hung.  Again, keep your seams positioned on the top and bottom.  Get your fingers in there and bunch it around how ever you need to.

When you're done filling the tube, all you need to do is tie the ends with the ribbon of your choice.


I can envision this project in a laundry room done with fabric from a man's shirt, or in a kitchen with an old, red gingham table cloth.  It would be cute in a baby's room created from a fuzzy towel, or on a mantle made with any sort of fabric that fits your decor.

Having accepted this challenge, I can safely say that I came it on budget at a whopping $2.61.  The massive hug I got from A. and the gasp she gave as she looked up at the garland from her bed and said, "Ooooooo ~ I looooove it, Mom!  Thank you."......priceless.

LinkWithin

Related Posts with Thumbnails